Getting started
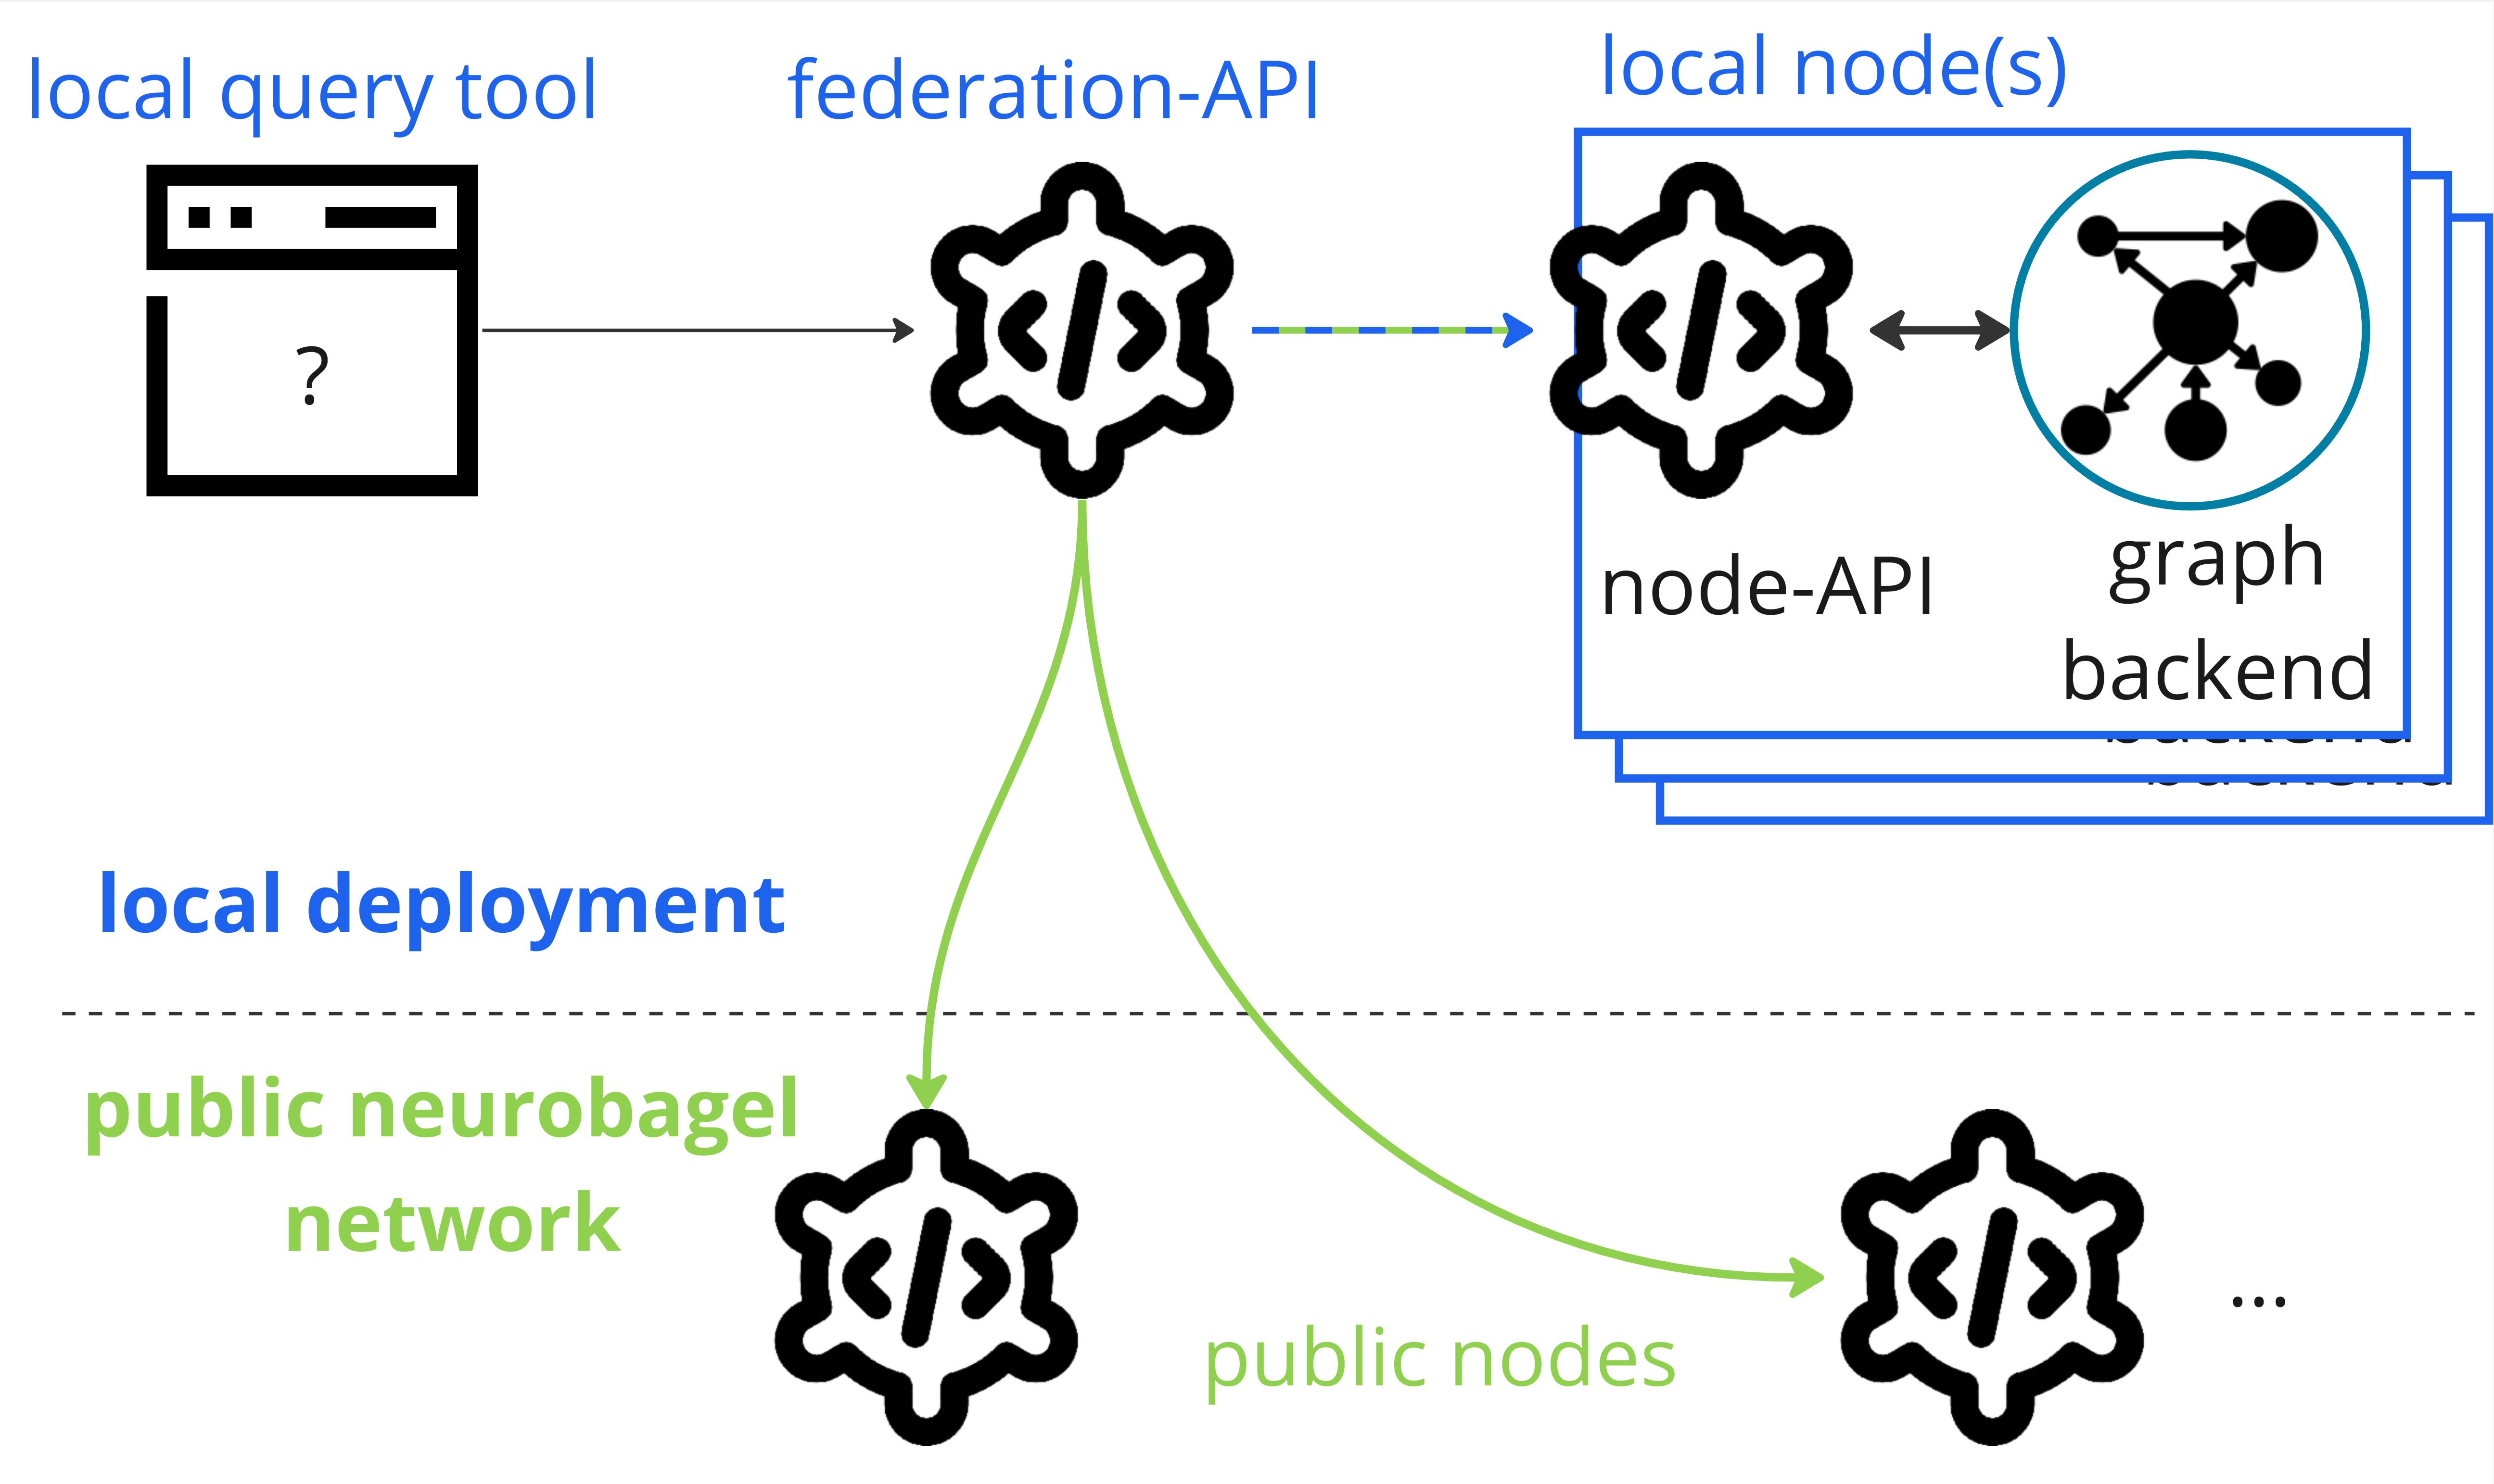
The following sections will get you started with deploying your own Neurobagel node, a graphical query tool, and a local federation API (everything in blue in the picture below) that lets you search across the data in your node and in public Neurobagel nodes.
To prepare your Neurobagel node for production use (i.e., for local or other users), and to configure your deployment according to your specific needs, refer to the detailed production deployment documentation.
Requirements
Neurobagel tools are provided as Docker containers and are launched with Docker Compose.
Don't install Neurobagel tools directly on your machine
Please only use the Docker images provided by Neurobagel
(or the third party providers Neurobagel relies on) and only launch
them with our provided docker-compose.yml recipe.
Do not install GraphDB locally on your computer, as doing so can interfere with the deployment of the Neurobagel tools.
docker and docker compose
If you haven't yet, please install both docker and docker compose
for your operating system:
-
Install Docker Desktop on Windows. This will install both
dockeranddocker compose. -
We strongly recommend also installing Windows Subsystem for Linux to get a Windows-supported Linux installation for a more seamless Neurobagel deployment experience. Simply follow these instructions to make your existing Docker Desktop installation (including Docker and Docker Compose) available when running WSL.
Install Docker Desktop on Mac.
This will install both docker and docker compose automatically.
Linux is the only supported OS
We test and deploy on Linux and ensure that our deployment instructions work on Linux systems.
We also try to provide docs and help for different architectures, but as a small team with limited resources we won't be able to help you debug Operating System specific problems.
Because we rely on some modern features of these tools, please make sure you have at least the following versions on your machine:
-
dockerengine: v20.10.24 or greaterdocker --version -
docker compose: v2.7.0 or abovedocker compose version
Quickstart recipe
The neurobagel/recipes repository
on GitHub contains our official
Docker Compose recipe and template configuration files for setting up a local Neurobagel node.
Production deployments require additional configuration
This section provides a minimal configuration for launching Neurobagel so you can get started quickly with trying out all services locally. In most cases, particularly when deploying Neurobagel for other users, additional configurations are necessary.
For a complete, production-ready setup containing real-world data, see our detailed instructions for production deployments.
Clone the recipe repository
Clone the recipes repository from GitHub and navigate into the cloned local repo.
git clone https://github.com/neurobagel/recipes.git
cd recipes
Copy the template files
Make copies of the template configuration files to use for your deployment.
cp template.env .env
cp local_nb_nodes.template.json local_nb_nodes.json
You can leave these files unchanged for a local test deployment. Our guide on setting up a production node has instructions on editing these files for a production server deployment.
On a machine with an ARM-based processor?
The default Docker Compose recipe assumes that you are launching Neurobagel on a machine with x86_64 (AMD/Intel) architecture (most Linux or Windows machines).
If your machine instead uses ARM-based architecture (e.g., certain Macs), additionally change the following line in your docker-compose.yml file:
    graph:
        image: "ontotext/graphdb:10.8.12"
    graph:
        image: "ontotext/graphdb:10.8.12-arm64"
lscpu.
Launch Neurobagel
Now you can launch your local Neurobagel node using Docker Compose:
docker compose up -d
This will:
- pull the required Docker images (if you haven't pulled them before)
- launch the containers for all the Neurobagel services
- automatically set up and configure the services based on your configuration files
- automatically upload example data to the Neurobagel graph
You can check that your docker containers have launched correctly by running:
docker ps
and you will want to see something like this to show all 4 services running:
❯ docker ps
CONTAINER ID   IMAGE                              COMMAND                  CREATED         STATUS         PORTS                                                 NAMES
d5e43f9ff0c2   neurobagel/federation_api:latest   "/bin/sh -c 'uvicorn…"   8 seconds ago   Up 8 seconds   0.0.0.0:8080->8000/tcp, :::8080->8000/tcp             recipes-federation-1
f0a26d0ea574   neurobagel/api:latest              "/usr/src/api_entryp…"   8 seconds ago   Up 8 seconds   0.0.0.0:8000->8000/tcp, :::8000->8000/tcp             recipes-api-1
d44d0b7359c8   ontotext/graphdb:10.8.12            "/usr/src/neurobagel…"   8 seconds ago   Up 8 seconds   0.0.0.0:7200->7200/tcp, :::7200->7200/tcp, 7300/tcp   recipes-graph-1
29a61a2d83de   neurobagel/query_tool:latest       "/bin/sh -c 'npm run…"   8 seconds ago   Up 8 seconds   0.0.0.0:3000->5173/tcp, :::3000->5173/tcp             recipes-query_federation-1
Next steps
 You are now the proud owner of a running Neurobagel node. Here are some things you can do now:
- Try the Neurobagel node you just deployed by accessing:
- your own query tool at http://localhost:3000, and reading the query tool usage guide
- the interactive docs for your node API at http://localhost:8000/docs, and reading the API usage guide
- Prepare your own dataset for annotation with Neurobagel
- Add your own data to your Neurobagel graph to search
- Learn how to make a production deployment
- Hopefully all went well, but if you are experiencing issues, see how to get help